How to frog Crochet Tutorial
Spring is finally here, and with it comes the rejuvenation of nature. As the flowers bloom and the trees regain their vibrant colors, the fields come alive with the chirping of birds and the croaking of frogs. Inspired by the lively spirit of the season, today's topic is all about crocheting your very own frogs.

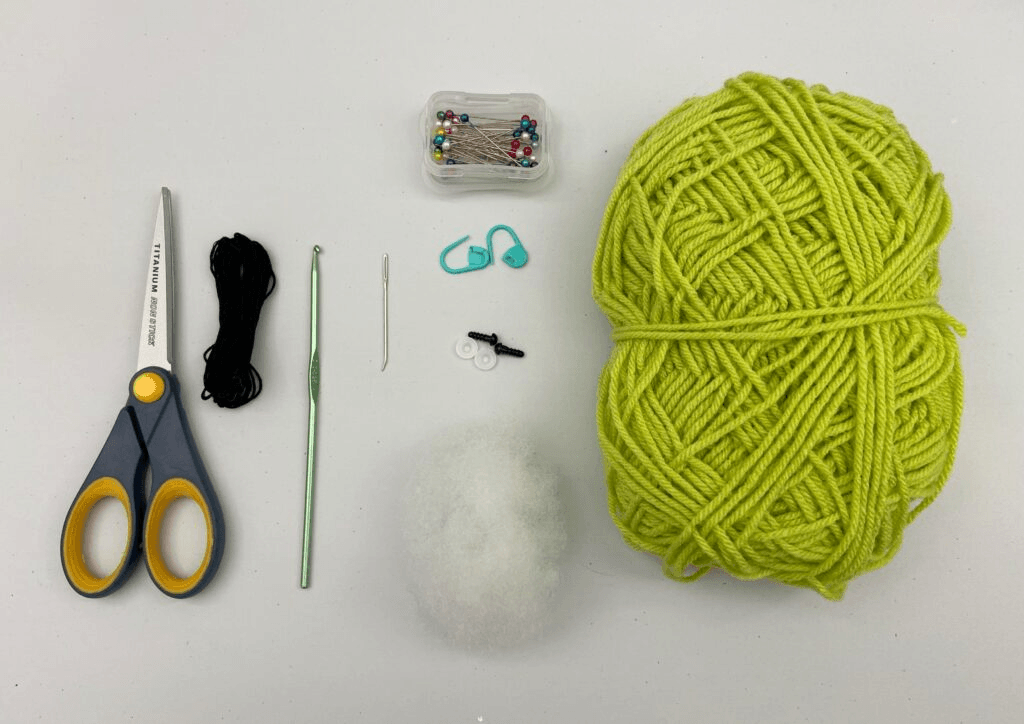
Materials:
3.25mm crochet hook
6mm safety eyes (1 pair)
Black embroidery thread
Green worsted weight yarn (I use the brand Loops & Thread’s Impeccable Yarn in the shade Citron)
Fiberfill stuffing
Scissors
Sewing pins
Yarn needle
Stitch markers
eyes
Using green yarn.
Row 1. magic circle with 6 sc stitches (6)
Row 2. inc x 6 (12)
Row 3. sc x 12 (12)
Arms/Legs (make 4)
Using green yarn.
Row 1. magic circle with 5 sc stitches (5)
Row 2. sc x 5 (5)
Row 3. sc x 5 (5)
Fasten off with a slip stitch. Leave a long tail for sewing onto the frog’s body.
Body
Using green yarn.
Row 1. magic circle with 6 sc stitches (6)
Row 2. inc x 6 (12)
Row 3. [sc, inc] x 6 (18)
Row 4. [sc x 2, inc] x 6 (24)
Row 5. [sc x 3, inc] x 6 (30)
Row 6. sc x 30 (30)
Row 7. sc x 30 (30)
Row 8. sc x 30 (30)
Row 9. sc x 30 (30)
Row 10. sc x 30 (30)
Once you’ve completed row 10, your frog’s body should look like this:
Now it is time to sew the mouth onto your frog! For this step you will need your yarn needle and black embroidery thread. Thread your needle with the black embroidery thread. Continue following the steps in the below photos to create your frog’s mouth.Row 11. sc x 30 (30)
Row 12. [sc x 3, dec] x 6 (24)
Row 13. [sc x 2, dec] x 6 (18)
Row 14. [sc, dec] x 6 (12)
Stuff firmly with fiber fill stuffing.
Row 15. dec x 6 (6)
Sew the hole closed and weave in the ends.
Assemble every part
Once you've got everything you need, it's time to dive into the assembly process. Begin by crocheting the body of your frog. You can choose any stitch pattern you prefer, but I find that a simple single crochet works well to create a tight-knit fabric that holds its shape nicely. Start with a magic ring and work your way up, increasing and decreasing as needed to form the shape of the body.
Next up, let's tackle those adorable froggy limbs. Using your chosen shade of green yarn, crochet two small circles for the front legs and two larger circles for the back legs. Don't forget to leave a long tail on each piece for sewing later on. Once you've got your circles, fold them in half and stitch the edges together to create little tubes. Stuff them lightly with stuffing to give them some dimension, then attach them to the body using your yarn needle.
Now, onto the eyes. Using the white yarn, crochet two small circles for the whites of the eyes. Then, switch to black yarn and crochet two even smaller circles for the pupils. Once you've got your eye pieces ready, sew them securely onto the front of the frog's head using your yarn needle and black yarn. Feel free to get creative with the placement to give your frog some personality!
Finally, add any additional details you'd like to personalize your frog. Whether it's a colorful belly, some cheeky eyebrows, or even a tiny crown, the sky's the limit when it comes to customizing your crochet creation.
And there you have it – your very own crocheted frog ready to hop into spring! Whether you're a seasoned crocheter or just starting out, crafting these adorable amphibians is sure to bring a smile to your face. So grab your yarn and hook, and let's get crocheting! Ribbit ribbit!



Leave a comment
This site is protected by hCaptcha and the hCaptcha Privacy Policy and Terms of Service apply.